To contact us Click HERE
These "easy as pie" apple pie biscuits are a weekend breakfast treat for my family. The preparation is so quick and simple, and although I've never made these with canned biscuits, they'd probably work in a pinch, too. Good enough for company, or even as a dessert, for those who may not be inclined to bake from scratch.
You'll need:
8 frozen buttermilk biscuits thawed
1 21 oz. can of premium apple pie filling
1 stick of melted butter
1/2 cup light brown sugar
1 Tbs. ground cinnamon
1 tsp. vanilla flavoring
glaze:
1/3 cup powdered sugar
2 Tbs. cream/milk
Preheat the oven to 375 degrees. Melt the butter, and brush on all sides of the skillet. I used my 10 inch cast iron skillet for these biscuits, but, you can use any comparable baking dish. In a bowl, mix together the brown sugar and cinnamon until blended.
Dip each biscuit in the butter, and sprinkle all sides with the cinnamon sugar mixture. Arrange side by side in the skillet.
Cut the apples in the pie filling into smaller pieces, and mix in 1 teaspoon of pure vanilla. Arrange over the biscuits.
Pour the remaining butter over all.
.
Sprinkle the last of the cinnamon sugar on top. Place the skillet into the oven and bake for 30-35 minutes, until golden.
Stir together the powdered sugar and cream/milk, and drizzle on top. Serve hot. Yield: 8 servings
Cook's note:
If you'd like to add nuts to these biscuits, sprinkle chopped nuts on top along with the brown sugar just before baking.
9/13/12 Featured on www. recipelion.com blog post celebrating National Biscuit Month
http://blog.recipelion.com/national-biscuit-month/
30 Eylül 2012 Pazar
Sweet Potato Biscuits
To contact us Click HERE
September has been declared "National Biscuit Month." God bless those who came up with such a celebration! Biscuits to us in the Southern US are, what scones are to the English. Hardly a day goes by that someone in my home declares their need for a fresh, hot, biscuit. I have to confess, I don't always have time to make homemade hot biscuits everyday. Especially, on busy weekday mornings before my husband heads into the office and I'm preparing to shuffle my little boys off to school.
Most mornings I find myself rushing to the car with my travel cup of hot tea in one hand, juggling my purse, keys and cell phone, and helping my little boy put his backpack on, with the other hand. My third hand closes the door to the house, while my fourth hand reaches into my purse to grab a tissue to wipe a runny nose, and my fifth hand opens the car door for his grand entrance. So, needless to say, I'm usually minus the dusting of flour that always comes along with making biscuits. ☺
I usually make homemade biscuits on the weekends, when I can enjoy the creative process of baking something from scratch. Sometimes we'll have biscuits for breakfast, and sometimes for dinner. They're almost always more than just flour, buttermilk, and shortening, although, there's not a thing wrong with that combination. When the crisp, cool mornings remind you that Fall is well on the way, these sweet potato biscuits will hit the proverbial "spot."
For the biscuits you'll need:
2 cups self rising flour
1/4 cup light brown sugar
1 stick of cold butter
1/2 cup cooked and pureed sweet potatoes
1/2 cup heavy cream plus add'l to brush the tops
1/2 tsp. ground cinnamon
1/4 tsp. salt
pinch of nutmeg
Preheat the oven to 425 degrees and line a baking sheet with parchment paper. In a mixing bowl, mix together the flour, brown sugar, salt and cinnamon. Cut in the cold butter using a pastry blender or your food processor until it resembles cornmeal.
Mix together the pureed sweet potatoes and cream in a separate bowl.
Add to the dry ingredients and mix just until moistened.
Turn onto a floured board and roll or pat about 1/2-3/4 inches thick. Use a floured cutter and cut into the desired size. I used a 3 inch biscuit cutter.
Place onto the baking sheet about 2 inches apart and brush the tops with additional cream.
Place into the oven and bake for 12-15 minutes until golden. Serve hot with a slice of country ham or honey butter. Yield: 8 3 inch biscuits
Cook's note:
For the sweet potato puree, I baked two sweet potatoes at 375 degrees for 50 minutes, then cooled and peeled. I pureed the pulp, and froze the extra, for a future batch of sweet potato biscuits.
Logan's Brown Butter Baby Lima Beans & Ham
To contact us Click HERE
I'd like to introduce you to my foodie sister and friend, Sherri. Sherri and I met when I won the National Flour Power Competition sponsored by The popular online recipe club called, "Just A Pinch Recipe Club" [JAP] of which Sherri and I are both members. Part of my winnings was to attend a live Showcase event held in Franklin Tennessee where I recreated my winning cake in front of a large audience of JAP members. Sherri was the emcee and previous winner with her "Smokin' Baby Got Back Ribs." We met for dinner the night before the Showcase, and we bonded instantly over our love of cooking and sharing. What a fun and unforgettable day we had on the day of the Showcase! She is an award winning cook, and I'm delighted she's joined me in my kitchen. Sherri, welcome and thank you for stopping by to share a recipe in my Southern Kitchen!
I'm originally from VA and we Southerners love our lima beans, butter beans, pinto beans, heck we just love our beans! I wanted to share this recipe with y'all. I love sharing, swapping, creating recipes. I hope that you enjoy my recipe. It's really quick, easy and delicious. Enjoy. I ♥ U twin. sw☺
Brown Butter Baby Lima Beans & Ham
1/2 stick butter, unsalted-more if you prefer
1 medium shallot, sliced thin
1/3 lb. ham on bone sliced, cooked and cut
16 oz. baby lima beans, frozen
1 tsp. beau monde seasoning or to taste *seasoning salt"
1/2 tsp course black pepper
2 pinches crushed red pepper flakes-optional
chives to garnish
Add butter to a medium high heat skillet. Whisk butter frequently to prevent burning. Butter will be ready when it's golden brown and nutty. Reduce heat.
Add shallots to skillet and saute for 1 minute. Add ham and continue to saute for another minute.
Add lima beans and remaining seasoning to pan. Simmer for 15 minutes or until lima beans are fork tender. Garnish with chives
Y'all ain't gonna believe this, but I even made a lima bean sammie with my leftovers....Yes, I indeed went there! LOL it was so, so good. sw
Here's a link to Sherri's Ribs : http://www.justapinch.com/recipes/main-course/pork/smokin-baby-got-back-ribs-3.html?p=1
Wendy's Autumn Pumpkin Cupcakes
To contact us Click HERE
These delightful Autumn inspired pumpkin cupcakes were created by my friend Wendy. Wendy is a fabulous pastry chef and I invited her to share this recipe on my Facebook wall. The response was so overwhelmingly positive, I decided to add it to my blog archives so it could be referenced again and again. Thanks for sharing, Wendy!
For the cupcakes you'll need
2 c flour
1 t baking powder
2 t baking soda
1 t salt
2 t pumpkin pie spice
4 eggs
2 c sugar
1 t vanilla
¾ c vegetable oil
1 – 15 oz can 100% pumpkin
Preheat oven to 350 and line cupcake pans with liners. Makes about 20.
Sift together flour, baking powder, baking soda, salt, spice and set aside.
In a large mixing bowl, combine eggs, sugar, oil, pumpkin and mix well.
Add wet ingredients to dry, mix well, being careful not to over mix.
Fill liners ¾ full, bake at 350 for 17-20 minutes. Or until, top springs back when touched.
Cool in pans 10 minutes, and then remove to racks to cool completely.
When cooled completely, you can frost with whipped cream or cream cheese icing…I personally like to drape them in the cream cheese icing! Then drizzle with caramel sauce.
Cream Cheese Frosting
8 oz cream cheese
8 oz butter
1 t vanilla
1 t lemon juice
3 c powdered sugar
In a large mixing bowl, cream together cream cheese and butter until smooth and creamy, 2-3 minutes. Scraping bowl as necessary, add vanilla and lemon juice, mixing well. Add powdered sugar and beat until very smooth, creamy and fluffy, 2-3 minutes.
Caramel Sauce
½ c butter
1 c brown sugar
¾ c heavy cream
¼ t salt
1 t vanilla
Melt butter in a saucepan over medium heat, add sugar stir until blended, whisk in cream and salt. Bring to a gentle boil and cook 5 minutes, boiling gently and whisking occasionally. Remove from heat and stir in vanilla. Allow to cool then store in air tight container in refrigerator. I use a squirt bottle (like the type ketchup or BBQ sauce comes in at a restaurant) This can be made a couples days in advance, just pop in microwave to warm just enough to drizzle. Microwave at 15 second intervals.
Applewood-Cider Slow Cooker Chicken
To contact us Click HERE
Lazy days are just as much a part of life as busy days. Slow cooking is a perfect choice for a lazy day in the kitchen. When I've got lots of irons in the fire, and I'm juggling everyone's schedule, that usually means I don't get to spend quite as much time putting together our meal as I would like. I almost always make my own dry rubs, and in fact, I prefer to concoct my own creations. Shocking, yes? ☺ However, like most of you, some days I find myself too busy, and I turn to a prepared rub to simplify my life, you know, on those "don't sweat the small stuff" kind of days.
The rub I used for this slow cooker chicken was a seasoning blend with smokey undertones. Paprika, garlic, granulated onion and a hint of applewood flavoring, along with other spices for added flavor. We love garlic, so, I added a couple of cloves of fresh minced garlic to the seasoned butter to give it an edge. The simple brine really infuses the chicken with moisture, and the apple flavor that we love. Slow cooking the chicken makes it fall off the bone tender.
You'll need:
51/2-6 lb. whole chicken
5 cups sparkling apple cider or apple cider divided
2 Tbs. applewood rub plus add'l for sprinkling [I used Grillmates]
4 Tbs. softened butter/margarine
2 minced cloves of garlic
The night before:
Mix together 4 cups of apple cider with 1/4 cup of salt. Stir until the salt dissolves. Wash the chicken, removing the giblets, then pour the brine over the chicken and refrigerate. Turn occasionally.
To prepare:
Spray the slow cooker with cooking spray and set on low. Remove the chicken from the brine, and pat dry. Mix together 2 tablespoons of applewood rub, two cloves of minced garlic and 4 tablespoons of butter. Rub all over the chicken. Loosen the skin around the breast and leg portions and tuck some of the mixture under the skin, too. Sprinkle the top with additional seasoning and center in your slow cooker.
Pour 1 cup of apple cider around the chicken and place the lid firmly on top. I used sparkling cider, simply because we love it. Plain apple cider or apple juice will work, too.
Cook for 6 -6 1/2 hours then check for doneness. Depending on how your slow cooker cooks, and the size of your chicken, it may take a little longer. My chicken was 5 1/2 pounds and it was perfectly done in 6 hours. Allow to rest covered until serving.
29 Eylül 2012 Cumartesi
Creole Bourbon Beans & Ham
To contact us Click HERE
I would describe these creole beans and ham, as a stove top casserole. This is one of those "stick to your ribs" kind of dishes, not fancy, but, soul satisfying. I simmer these beans right on the stove top while my cornbread is baking. It's a wonderful, hearty, filling meal after a long day. To me, all you need is a couple of wedges of buttered cornbread and a sprinkle of chopped green onions on top, and it's a meal.
You'll need:
2 22 oz. cans of bourbon & brown sugar baked beans [I used Bush's]
1 1/2-2 cups of fully cooked ham, cubed
1 medium sweet onion diced
1/4 cup each of red, yellow and green peppers
2/3 cup of chili sauce
1/4 cup packed brown sugar
1 Tbs. creole mustard
1/2 tsp. liquid smoke
3 slices of bacon cooked and crumbled
2 Tbs. bacon drippings
Seasonings:
1 tsp. creole seasoning
3/4 tsp. garlic powder
1/2 tsp. oregano
1/4 tsp. paprika
1/4 tsp. cumin
1/8 tsp. cayenne [or more to taste]
salt & pepper to taste
garnish:
chopped green onions
cornbread for serving
On the stove top in a heavy bottomed pot, saute the chopped onion and peppers in a couple of tablespoons of bacon drippings until they begin to brown, then add the cubed ham. Season with salt and pepper to your taste. Continue to saute over medium-high heat for 2-3 minutes until the ham begins to brown.
Next, add the baked beans, chili sauce, brown sugar, creole mustard, liquid smoke and seasonings. Give it a good stir, and bring to a boil, stirring periodically to prevent sticking, before lowering the heat to a simmer.
Cover and simmer for 30 minutes, stirring periodically. After 30 minutes, uncover, stir and continue to slowly bubble for an additional 15-20 minutes to allow the sauce to reduce, thicken and give the flavors time to intensify. Stir the crumbled bacon in just before serving. Serve hot over buttered cornbread and topped with chopped green onions. Yield: 6 servings
Logan's Brown Butter Baby Lima Beans & Ham
To contact us Click HERE
I'd like to introduce you to my foodie sister and friend, Sherri. Sherri and I met when I won the National Flour Power Competition sponsored by The popular online recipe club called, "Just A Pinch Recipe Club" [JAP] of which Sherri and I are both members. Part of my winnings was to attend a live Showcase event held in Franklin Tennessee where I recreated my winning cake in front of a large audience of JAP members. Sherri was the emcee and previous winner with her "Smokin' Baby Got Back Ribs." We met for dinner the night before the Showcase, and we bonded instantly over our love of cooking and sharing. What a fun and unforgettable day we had on the day of the Showcase! She is an award winning cook, and I'm delighted she's joined me in my kitchen. Sherri, welcome and thank you for stopping by to share a recipe in my Southern Kitchen!
I'm originally from VA and we Southerners love our lima beans, butter beans, pinto beans, heck we just love our beans! I wanted to share this recipe with y'all. I love sharing, swapping, creating recipes. I hope that you enjoy my recipe. It's really quick, easy and delicious. Enjoy. I ♥ U twin. sw☺
Brown Butter Baby Lima Beans & Ham
1/2 stick butter, unsalted-more if you prefer
1 medium shallot, sliced thin
1/3 lb. ham on bone sliced, cooked and cut
16 oz. baby lima beans, frozen
1 tsp. beau monde seasoning or to taste *seasoning salt"
1/2 tsp course black pepper
2 pinches crushed red pepper flakes-optional
chives to garnish
Add butter to a medium high heat skillet. Whisk butter frequently to prevent burning. Butter will be ready when it's golden brown and nutty. Reduce heat.
Add shallots to skillet and saute for 1 minute. Add ham and continue to saute for another minute.
Add lima beans and remaining seasoning to pan. Simmer for 15 minutes or until lima beans are fork tender. Garnish with chives
Y'all ain't gonna believe this, but I even made a lima bean sammie with my leftovers....Yes, I indeed went there! LOL it was so, so good. sw
Here's a link to Sherri's Ribs : http://www.justapinch.com/recipes/main-course/pork/smokin-baby-got-back-ribs-3.html?p=1
I'm originally from VA and we Southerners love our lima beans, butter beans, pinto beans, heck we just love our beans! I wanted to share this recipe with y'all. I love sharing, swapping, creating recipes. I hope that you enjoy my recipe. It's really quick, easy and delicious. Enjoy. I ♥ U twin. sw☺
Brown Butter Baby Lima Beans & Ham
1/2 stick butter, unsalted-more if you prefer
1 medium shallot, sliced thin
1/3 lb. ham on bone sliced, cooked and cut
16 oz. baby lima beans, frozen
1 tsp. beau monde seasoning or to taste *seasoning salt"
1/2 tsp course black pepper
2 pinches crushed red pepper flakes-optional
chives to garnish
Add butter to a medium high heat skillet. Whisk butter frequently to prevent burning. Butter will be ready when it's golden brown and nutty. Reduce heat.
Add shallots to skillet and saute for 1 minute. Add ham and continue to saute for another minute.
Add lima beans and remaining seasoning to pan. Simmer for 15 minutes or until lima beans are fork tender. Garnish with chives
Y'all ain't gonna believe this, but I even made a lima bean sammie with my leftovers....Yes, I indeed went there! LOL it was so, so good. sw
Here's a link to Sherri's Ribs : http://www.justapinch.com/recipes/main-course/pork/smokin-baby-got-back-ribs-3.html?p=1
Roasted Mesquite Rubbed Pork Tenderloin 2 Ways
To contact us Click HERE
Today, I'm sharing two recipes in one. Cook once, eat twice. The second dish of quesadillas is the encore presentation of a roasted mesquite rubbed pork tenderloin that we enjoyed this past weekend. I had intended to grill the tenderloin, but, alas, a sudden rain storm prevented that from, happening. So, I adapted and switched to plan B. I roasted both tenderloins in the oven. They were around 1 1/2 pounds each.
You'll need:
2 1 1/2 lb. pork tenderloins [approx.]
olive oil
mesquite seasoning rub [I used Grillmates]
To prepare, drizzle each piece with olive oil and then rub with a mesquite seasoning blend. This should be done several hours in advance, I prefer to cover, and let the tenderloin marinate overnight for the best flavor results. To roast, place onto a prepared pan, and give them a light drizzle of olive oil just before roasting. Roast at 375 degrees for around 28-30 minutes. Then, increase the oven temperature to 425 degrees for the last 8 minutes, depending on the size and thickness of the tenderloin, of course. Place an aluminum foil tent over the pork after removing from the oven, and allow to rest for at least 15 minutes before carving. Wow, was it ever delicious with a side of bake beans and fresh corn on the cob! Truly, good eats!
The next night we had these superb mesquite rubbed tenderloin quesadillas. Quesadillas are so versatile, this preparation would also work with any left over grilled or roasted meats, such as steak, London broil, chicken, or even pulled pork would be fantastic. And, for my vegetarian friends, how about mesquite rubbed peppers, onions, mushrooms and squash quesadillas? Healthy and astonishingly delicious!
For 6 quesadillas you'll need:
1 1/2 lbs. [approx.] fully cooked mesquite seasoned pork tenderloin thinly sliced
6 10 inch flour tortillas
2 1/2-3 cups of shredded pepper jack cheese
2 large poblano peppers roasted and sliced
1 large sweet onion roasted and sliced
1/3 cup roughly chopped cilantro
garlic salt
olive oil
assorted accompaniments: guacamole, salsa, tortilla chips
Preheat the oven to 450 degrees and line a baking sheet with foil. Spray with cooking spray. Remove the stem and seeds from the poblano peppers and slice in half. Arrange cut side down on the baking sheet. Thinly slice the onion and arrange in a single layer on the baking sheet. Spray both with cooking spray or drizzle the onions with oil, and season with garlic salt and pepper to your taste.
Roast for 15-20 minutes until the skin on the peppers begins to bubble and brown. Remove from the oven, and place into a plastic storage bag and seal. Let the peppers steam for 15-20 minutes, then the skin will peel off easily.
Slice into strips.
Brush one side of each tortilla with olive oil, place into the pan oil side down. Divide the filling evenly between the quesadillas. Begin building starting with the shredded cheese, sliced tenderloin, roasted poblano and onions, and another layer of cheese. Sprinkle with roughly chopped cilantro then fold over.
Grill over medium-high heat, until one side browns, then carefully turn. Cook until the cheese has melted and the filling is heated through.
Cut into wedges and serve hot with your favorite sides. Yield 6 quesadillas
Wendy's Autumn Pumpkin Cupcakes
To contact us Click HERE
These delightful Autumn inspired pumpkin cupcakes were created by my friend Wendy. Wendy is a fabulous pastry chef and I invited her to share this recipe on my Facebook wall. The response was so overwhelmingly positive, I decided to add it to my blog archives so it could be referenced again and again. Thanks for sharing, Wendy!
For the cupcakes you'll need
2 c flour
1 t baking powder
2 t baking soda
1 t salt
2 t pumpkin pie spice
4 eggs
2 c sugar
1 t vanilla
¾ c vegetable oil
1 – 15 oz can 100% pumpkin
Preheat oven to 350 and line cupcake pans with liners. Makes about 20.
Sift together flour, baking powder, baking soda, salt, spice and set aside.
In a large mixing bowl, combine eggs, sugar, oil, pumpkin and mix well.
Add wet ingredients to dry, mix well, being careful not to over mix.
Fill liners ¾ full, bake at 350 for 17-20 minutes. Or until, top springs back when touched.
Cool in pans 10 minutes, and then remove to racks to cool completely.
When cooled completely, you can frost with whipped cream or cream cheese icing…I personally like to drape them in the cream cheese icing! Then drizzle with caramel sauce.
Cream Cheese Frosting
8 oz cream cheese
8 oz butter
1 t vanilla
1 t lemon juice
3 c powdered sugar
In a large mixing bowl, cream together cream cheese and butter until smooth and creamy, 2-3 minutes. Scraping bowl as necessary, add vanilla and lemon juice, mixing well. Add powdered sugar and beat until very smooth, creamy and fluffy, 2-3 minutes.
Caramel Sauce
½ c butter
1 c brown sugar
¾ c heavy cream
¼ t salt
1 t vanilla
Melt butter in a saucepan over medium heat, add sugar stir until blended, whisk in cream and salt. Bring to a gentle boil and cook 5 minutes, boiling gently and whisking occasionally. Remove from heat and stir in vanilla. Allow to cool then store in air tight container in refrigerator. I use a squirt bottle (like the type ketchup or BBQ sauce comes in at a restaurant) This can be made a couples days in advance, just pop in microwave to warm just enough to drizzle. Microwave at 15 second intervals.
These delightful Autumn inspired pumpkin cupcakes were created by my friend Wendy. Wendy is a fabulous pastry chef and I invited her to share this recipe on my Facebook wall. The response was so overwhelmingly positive, I decided to add it to my blog archives so it could be referenced again and again. Thanks for sharing, Wendy!
For the cupcakes you'll need
2 c flour
1 t baking powder
2 t baking soda
1 t salt
2 t pumpkin pie spice
4 eggs
2 c sugar
1 t vanilla
¾ c vegetable oil
1 – 15 oz can 100% pumpkin
Preheat oven to 350 and line cupcake pans with liners. Makes about 20.
Sift together flour, baking powder, baking soda, salt, spice and set aside.
In a large mixing bowl, combine eggs, sugar, oil, pumpkin and mix well.
Add wet ingredients to dry, mix well, being careful not to over mix.
Fill liners ¾ full, bake at 350 for 17-20 minutes. Or until, top springs back when touched.
Cool in pans 10 minutes, and then remove to racks to cool completely.
When cooled completely, you can frost with whipped cream or cream cheese icing…I personally like to drape them in the cream cheese icing! Then drizzle with caramel sauce.
Cream Cheese Frosting
8 oz cream cheese
8 oz butter
1 t vanilla
1 t lemon juice
3 c powdered sugar
In a large mixing bowl, cream together cream cheese and butter until smooth and creamy, 2-3 minutes. Scraping bowl as necessary, add vanilla and lemon juice, mixing well. Add powdered sugar and beat until very smooth, creamy and fluffy, 2-3 minutes.
Caramel Sauce
½ c butter
1 c brown sugar
¾ c heavy cream
¼ t salt
1 t vanilla
Melt butter in a saucepan over medium heat, add sugar stir until blended, whisk in cream and salt. Bring to a gentle boil and cook 5 minutes, boiling gently and whisking occasionally. Remove from heat and stir in vanilla. Allow to cool then store in air tight container in refrigerator. I use a squirt bottle (like the type ketchup or BBQ sauce comes in at a restaurant) This can be made a couples days in advance, just pop in microwave to warm just enough to drizzle. Microwave at 15 second intervals.
Beef & Blue Cheese Biscuits
To contact us Click HERE
This variation on a biscuit was the result of an "ah ha" moment. I love to make all sorts of biscuits, some more tailored for breakfast meals, and some sweet versions, such as scones, to serve for brunch or tea. This beef and blue cheese biscuit is a terrific dinner bread. I really love the robust flavor of blue cheese, and personally, I gravitate to those that are heavily blue veined. However, I recognize that this is an acquired taste, so, for these biscuits, I chose a milder gorgonzola cheese to appeal to a wider audience. These biscuits can be served with a side of sweet chive butter to accompany any meal. My favorite way to serve these for a tea or brunch, is a to add a couple of slices of juicy tomato, a light sprinkle of salt and a drizzle of horseradish sauce. Beef, blue cheese and horseradish, well, it's practically the fillet mignon of biscuits!
For the biscuits you'll need:
2 cups self rising flour
4-5 oz. gorgonzola/blue cheese crumbles
1/2 cup chopped dried beef [I used Armor]
1 1/2 cups heavy cream plus 2 Tbs.
1 1/2 Tbs. finely chopped chives
1 tsp. garlic powder
1 tsp. sugar
1/4 tsp. paprika
add'l heavy cream to brush the tops
To prepare the biscuits:
Preheat the oven to 450 degrees and line a baking sheet with parchment. In a large mixing bowl, mix together the flour, blue cheese crumbles, chopped beef, chives and seasonings.
Make a well in the center and add 1 1/2 cups plus 2 tablespoons of heavy cream. You'll need additional cream to brush the tops before baking.
Use a large spoon and mix until combined. I used a silicone spatula and the dough didn't stick to it making the mixing a lot easier. Turn out onto a lightly floured surface, then pat or roll to 1/2-3/4 inch in thickness. I used a 2 inch cutter and yielded 14 biscuits. You can make these biscuits any size you like.
Place onto the baking sheet at least 1 inch apart. Brush the tops with additional heavy cream.
Place into the oven and bake for 14-15 minutes until golden. Serve hot. Yield: 14 2 inch biscuits
28 Eylül 2012 Cuma
tangy tomato pasta $3.61 recipe / $0.79 serving
To contact us Click HERE
tangy tomato pasta
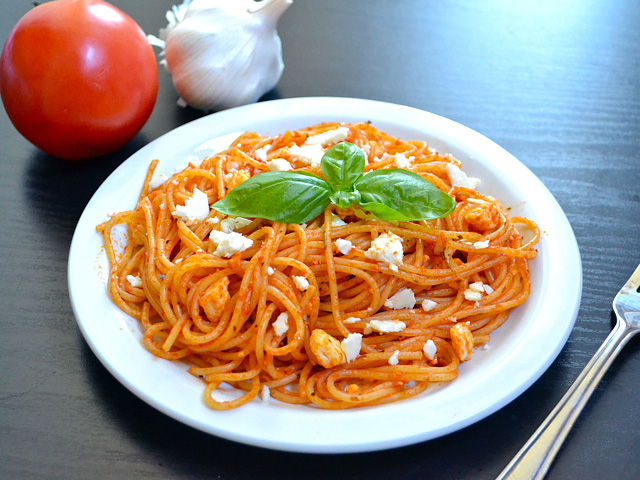
If you're in the need of a super quick and easy side dish, this might be the one for you.
I wanted something really fast and easy tonight so I turned to my pantry. I had some pasta, some tomato paste, and I knew I had some feta in the fridge. Easy. I'll just mix up a batch of my (not) sun dried tomato sauce, toss some pasta in it, crumble on a little feta for extra oomph, and I'll be good to go!
I halved the olive oil from the original (not) sun dried tomato sauce, which helped it stick to the pasta better. If you have some fresh herbs (parsley or basil), add it in for color and a pop of freshness. If you need something a little more hearty, try adding in some sauteed and sliced Italian sausage links. Pair this with some garlic bread and maybe some roasted broccoli and you've got a nice, light dinner!
Total Recipe cost: $3.61
Servings Per Recipe: 4 (larger portions) or 6 (side dish sized portions)
Cost per serving: $0.79 (for four servings)
Prep time: 5 min. Cook time: 15 min. Total: 20 min.
STEP 1: Fill a large pot with water and bring to a boil over a high flame.
STEP 2: While waiting for the water to boil, begin the tomato sauce in a separate skillet. Mince a clove of garlic and combine it with the olive oil, basil, oregano, salt, rosemary, thyme, crushed red pepper, and cracked black pepper. Heat over a medium flame. Stir the mixture and allow it to start sizzling. Stir and sizzle for about one minute.
STEP 3: Add the tomato paste, turn the heat down to medium-low, and continue to cook and stir until the mixture turns a darker shade of red (about 2 minutes more). Turn off the heat and then stir in the honey.
STEP 4: When the water begins to boil hard, add the spaghetti. Cook for 7-10 minutes or until tender. Once the pasta is tender, drain briefly and then add it to the skillet with the tomato sauce. Stir to coat. (Reserve about 1/2 cup of the starchy pasta cooking water to add back into the pasta if it becomes dry while mixing with the tomato sauce).
STEP 5: Crumble about 2 ounces of feta cheese into the skillet and stir to combine. Divide the pasta onto individual plates and crumble about a 1/4 ounce more of feta over top of each serving. Enjoy!
Begin to boil a large pot of water for the pasta. In the meantime, begin the sauce. Mince a clove of garlic and combine it in a skillet with the rest of the herbs and spices (oregano, basil, salt, thyme, rosemary, crushed red pepper, and cracked black pepper). Stir and heat that mixture over a medium flame. Let it come up to a sizzle and then continue stirring for about one minute.
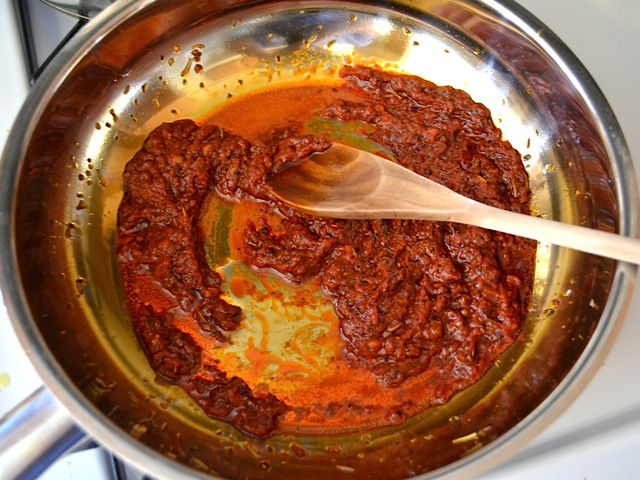
Next add the tomato paste (half of a little 6 oz. can) and stir into the oil herb mixture. Turn the heat down slightly so that it doesn't burn and continue to cook and stir until the tomato paste turns from a bright red to this darker shade of burgundy. Turn the heat off and then stir in the honey.
By this time the water is probably boiling and you can add the pasta. Cook the pasta for 7-10 minutes or until tender.
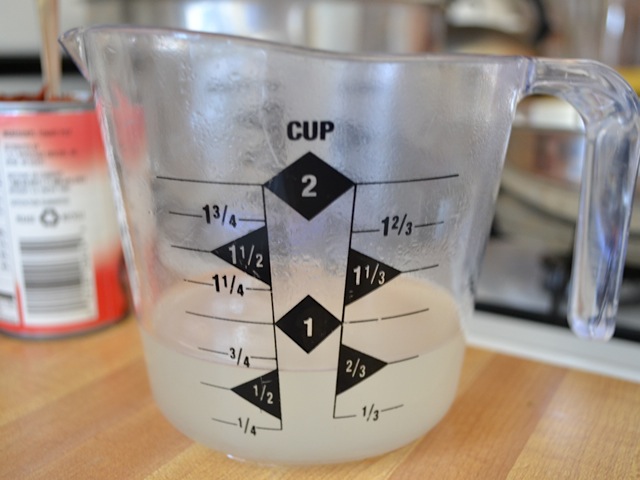
Save some of the starchy pasta cooking water in case the pasta gets dry while you're mixing it all together.
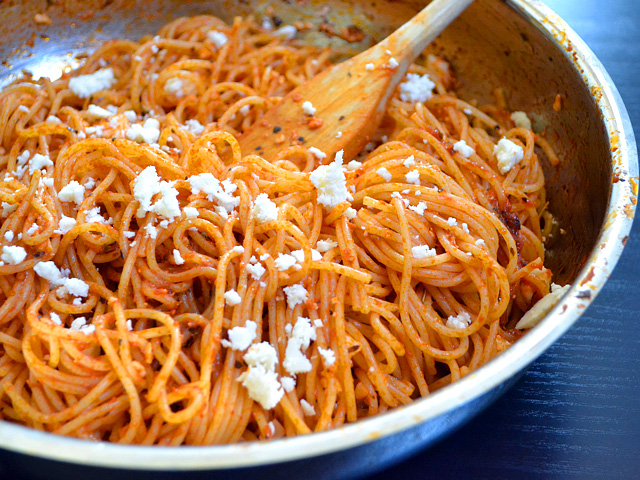
Briefly drain the cooked pasta and add it to the skillet with the tomato sauce. Stir to coat. If it gets dry or sticky, add a touch of the pasta cooking water to loosen it up. Just a touch.
Crumble about 2 ounces of feta over top and stir it in. Use the rest of the feta to sprinkle over the top of each serving.
Simple, fast, easy.
I wonder what a splash of wine would do to this tomato sauce... Mmmmm.
tangy tomato pasta $3.61 recipe / $0.79 serving
If you're in the need of a super quick and easy side dish, this might be the one for you.I wanted something really fast and easy tonight so I turned to my pantry. I had some pasta, some tomato paste, and I knew I had some feta in the fridge. Easy. I'll just mix up a batch of my (not) sun dried tomato sauce, toss some pasta in it, crumble on a little feta for extra oomph, and I'll be good to go!
I halved the olive oil from the original (not) sun dried tomato sauce, which helped it stick to the pasta better. If you have some fresh herbs (parsley or basil), add it in for color and a pop of freshness. If you need something a little more hearty, try adding in some sauteed and sliced Italian sausage links. Pair this with some garlic bread and maybe some roasted broccoli and you've got a nice, light dinner!
Tangy Tomato Pasta
Total Recipe cost: $3.61
Servings Per Recipe: 4 (larger portions) or 6 (side dish sized portions)
Cost per serving: $0.79 (for four servings)
Prep time: 5 min. Cook time: 15 min. Total: 20 min.
INGREDIENTS | COST | |
6 oz. | thin spaghetti | $0.97 |
3 Tbsp | olive oil | $0.36 |
1 clove | garlic | $0.08 |
1/2 tsp | dried basil | $0.03 |
1/2 tsp | dried oregano | $0.03 |
1/2 tsp | salt | $0.02 |
1/4 tsp | dried rosemary | $0.02 |
1/4 tsp | dried thyme | $0.02 |
a pinch | crushed red pepper | $0.02 |
a few cranks | pepper mill | $0.02 |
3 oz. | tomato paste | $0.26 |
1/2 tsp | honey | $0.02 |
3 oz. | feta cheese | $1.31 |
TOTAL | $3.61 |
STEP 1: Fill a large pot with water and bring to a boil over a high flame.
STEP 2: While waiting for the water to boil, begin the tomato sauce in a separate skillet. Mince a clove of garlic and combine it with the olive oil, basil, oregano, salt, rosemary, thyme, crushed red pepper, and cracked black pepper. Heat over a medium flame. Stir the mixture and allow it to start sizzling. Stir and sizzle for about one minute.
STEP 3: Add the tomato paste, turn the heat down to medium-low, and continue to cook and stir until the mixture turns a darker shade of red (about 2 minutes more). Turn off the heat and then stir in the honey.
STEP 4: When the water begins to boil hard, add the spaghetti. Cook for 7-10 minutes or until tender. Once the pasta is tender, drain briefly and then add it to the skillet with the tomato sauce. Stir to coat. (Reserve about 1/2 cup of the starchy pasta cooking water to add back into the pasta if it becomes dry while mixing with the tomato sauce).
STEP 5: Crumble about 2 ounces of feta cheese into the skillet and stir to combine. Divide the pasta onto individual plates and crumble about a 1/4 ounce more of feta over top of each serving. Enjoy!
Step By Step Photos
Begin to boil a large pot of water for the pasta. In the meantime, begin the sauce. Mince a clove of garlic and combine it in a skillet with the rest of the herbs and spices (oregano, basil, salt, thyme, rosemary, crushed red pepper, and cracked black pepper). Stir and heat that mixture over a medium flame. Let it come up to a sizzle and then continue stirring for about one minute.
Next add the tomato paste (half of a little 6 oz. can) and stir into the oil herb mixture. Turn the heat down slightly so that it doesn't burn and continue to cook and stir until the tomato paste turns from a bright red to this darker shade of burgundy. Turn the heat off and then stir in the honey.
By this time the water is probably boiling and you can add the pasta. Cook the pasta for 7-10 minutes or until tender.
Save some of the starchy pasta cooking water in case the pasta gets dry while you're mixing it all together.
Briefly drain the cooked pasta and add it to the skillet with the tomato sauce. Stir to coat. If it gets dry or sticky, add a touch of the pasta cooking water to loosen it up. Just a touch.
Crumble about 2 ounces of feta over top and stir it in. Use the rest of the feta to sprinkle over the top of each serving.
Simple, fast, easy.
I wonder what a splash of wine would do to this tomato sauce... Mmmmm.
Kaydol:
Kayıtlar (Atom)